Friday, October 30, 2009

Christmas Cactus 2009

A month or so ago while doing a residential job, I commented to the homeowner on the large plant on her patio. She told me it was a Christmas Cactus and that it blooms into pretty pink flowers once a year. She offered to give me a cutting from it but I said, no, I'll kill it for sure. But she said no, it's easy to grow, just put the cuttings in water and when roots start growing, pot it.

So I took some cuttings home and put them in a glass with water and left it on my front porch. There didn't seem to be much change at all from day to day. It wasn't dying, but it didn't seem to be growing either.

Then the second weekend of October, temps dropped and we had snow in the forecast so I moved it indoors. Placed it on the shelf over my kitchen sink, directly under the cabinet light. Within days, it was noticably bigger. The little bumps on the ends grew into pink buds, and then the buds started blooming. It's blooming like crazy now, a new bud opening almost every day.
(Click images for larger pictures.)

Oct. 23Oct. 25
Oct. 27Oct. 29
Close-ups of one of the buds blooming.
Oct. 25Oct. 27Oct. 29
Pretty isn't it? Since it's called a Christmas Cactus I don't think it's supposed to be blooming this early, so it's probably getting too much light under the cabinet there, but what the heck. If I keep it there maybe it'll keep blooming all the way to Christmas.

Sparkle Plenty Necklace

Isn't this just super fabulous?!
Sparkle Plenty
Conversation starter show stopper stunning!
Festive one of a kind piece with real pearls and Swarovski crystals - and free shipping - how could you go wrong with this?
It happens to be a MoeArt creation and Moe happens to be my Aunt but I'm not being biased (well ,maybe a little), I just think it's a fabulous piece that deserves some attention. :) Check it out.

Friday, October 16, 2009

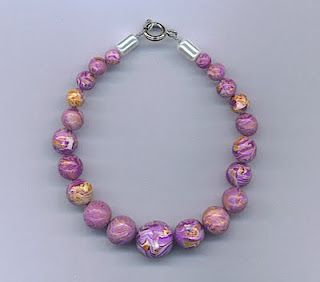
Brain Beads Bracelet

Feeling encouraged after the Earth Bead II bracelet and some practice making twisted loops I made this simple strand bracelet.
Brain Bead Bracelet
You can see I drilled some of the holes off-center, but look at the ends! My best attempt yet. Third time's a charm they say. :)

The beads don't look like brains (do they?) but the lump of scrap clay I made them from did, thus the name if you're wondering.
The Brian

Earth Bead Bracelet II

After the first necklace I decided I HAD to string up - and do the ends - on some of the loose beads I had made before moving on to anything else.
I had enough Earth Beads left to do another bracelet but thought another plain strand would be boring. So I decided I'd make the original single-strand bracelet into a double-strand bracelet. And I decided having the two strands lying together would be no fun, I'd have to make a separator somehow.
No idea how I was going to do that, but I was bound and determined.
This is what I ended up with:
Earth Bead Bracelet Doubled
The ends on the new strand were an improvement over the ends on first strand and I was pleased as punch with the separators. Can't explain how I got there, but the separators are on double lengths of jewelry wire so they are stiff enough to keep the strands separated and strong enough I think that they won't break.
Earth Bead Bracelet DoubledEarth Bead Bracelet Doubled
I've worn this a bunch already and so far so good, no breakage and it fits over my wrist bone just the way I like, a bonus I guess of learning to make your own jewelry. And I'm learning I thinks!

First Necklace

first necklace
This was my first attempt at stringing beads together into something I could actually wear. I used plain beads from my Martian Bead set, which are the first beads I made. They look like they all have flat spots, but they don't, that's just the light reflection in the picture. Which, by the way, is not actually a photo. It's a scan. Put the necklace on the scanner and wah-lah! - nice pic with very little effort. Thanks to Tammy of Shimmerwyck Jewelry for that great tip!

But where was I? Stringing. This is when I learned that 1) there are LOTS of choices for what to string on, and 2) that at some point, learning real wire wrapping techniques would be a good idea. ;)
I strung it on an ultra-fine jewelry wire and then there it sat, no clasps, until I fudged my way through finishing the Earth Bead Bracelet. With that experience under my belt (Hah!) I tackled these ends. Better but still far from proper.

Tuesday, October 13, 2009

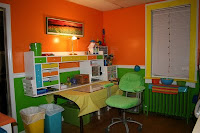
My New "Craft Corner"

001
002
003
It's finally done and I am one happy camper!
(Or maybe that should be happy crafter instead?)
I now have a dedicated work space that is cheerful, inspiring, and organized.

YAY!

We knew the shelf unit was longer than the table and would overhang it so we had to add a base to it. Looks a little off-kilter over reaching the table as it does but the bonus is I ended up with extra storage space that way.

The large right-side cubby-hole had doors which I initially thought would be nice for hiding large unsightly items, but I decided to leave them off instead so that the little 3-drawer organizer holding my hand tools fits in there.

The shadeless light used to be a nice bankers type lamp with a green glass shade. But I of course broke the shade. :( So it looks tacky but I like the extra light it gives off without a shade so am keeping it, tacky or not.

004
005
After countless coats of white paint inside the trays and drawers and STILL seeing the wood grain "bleed" through, I decided to heck with that and lined the bottoms with heavy-duty paper from the craft store.

Adds an extra touch of color when I open them and bonus, I can easily change the paper lining if/when the current stuff gets gooked up.
But I have lots of drawer space now.

YAY!

The tall, narrow blue drawer slides out to reveal three more long shelves with semi-sides on them to keep things from falling out when I open it. I originally wanted to keep that space open, for magazines, but Other-Half made a magazine rack on the left end of the piece, so no need. Now I have a magazine rack and a nifty extra pull-out storage place. :)
006007
In the main "inside" area, we added two wooden dowel rods for hanging strands of beads or works-in-progress or what not. Not sure yet, but they seemed like a good idea. ;)

The wall outlet had to be changed. It was only a two-hole outlet while most everything I want to plug in has three prongs. Sigh. Always a complication somewhere. So Other-Half replaced the outlet for me. Wonderful! Except, the outlet was already nearly blocked by the edge of the table. When we put the shelf in place with its back lip, the outlet became inaccessible. :(
Raising the outlet was out of the question so ever-thinking Other-Half cut the table legs down a few inches. :) Great! That made the outlet fully accessible, 'cept now the rolling cart I have my clay and beads stored in didn't fit under the table anymore. So I had to move the cart elsewhere which meant moving a chair that had occupied the space the cart is now in to the living room which meant re-arranging the living room some to make room for the chair. Whew!

But it all worked out and I am deliriously happy with my new "craft corner" and with my Other-Half who not only gave his time and talent to this project but also gave up half his kitchen so that I could have a nice work space. :)

Sunday, October 4, 2009

Green Chair

A year or so ago I bought some soft stretchy sort-of-fuzzy bright green fabric. I intended to cover my dingy gray utility chair with it but after a battle with my sewing machine I banished both machine and fabric to the basement.
But now that my kitchen/craft-corner makeover is mostly complete, I HAD to cover the chair, it was an ugly frown in an otherwise happy room.

So I retrieved the fabric and set to it. The seat was easy. I just cut a piece roughly the right size and stapled it on to the underside then trimmed the excess. Did the same with the arms, but added some extra padding first.
The back though, that's another story. It's curved and both sides as well as the edge all the way around are visible. Now some time ago, back when I was still on speaking terms with my sewing machine, I covered an identical chair in purple. For that one I cut a front piece, back piece, and edge piece, and somehow managed to sew all three pieces together, ending with a cover that fits right over the back and can be slipped off for washing. Ok, but not something I wanted to try with my fuzzy green fabric sans sewing machine.

So what to do? Well, like with many things, I just winged it. I stretched the fabric around the front and edges and stapled it on the back side, same way I did the seat. Half-way there; now I just needed to cut a piece to cover the back and attach it in a manner that wouldn't leave awful-looking seems all the way around.
I cut the piece and got some invisible thread I had lying around and set about trying to sew it on. Have you ever seen invisible thread?
It looks like this:
invisible thread
Don't see it? Neither did I. Just trying to thread the needle was an ordeal; sewing with it made me want to pull my hair out. I gave up and switched to a green thread instead, normal thread. Much better. I got the back piece sewed on and much to my delight, turns out the fabric is just fuzzy enough that the seam virtually disappeared. Great! I didn't have to worry about nice neat stitches or a straight seam.

Here's the chair:
green chair
A very quick make-over - if you don't count the year+ I had the fabric. :)