Wednesday, December 9, 2009
CDC ALERT
Important CDC Bulletin
Sunday, November 22, 2009
Pick a Pack of Purple Peas

When they are all good and dried out I will shell them and save the seeds for next year. I think I'll have enough to cover our whole block in vines!
What is a Hyacinth Bean vine you ask? It's a hearty annual climbing plant that produces lovely purple & white flowers and large shiny royal-purple pods that turn magenta-hued with time.
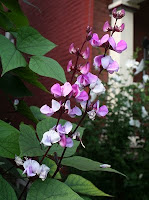 |  |

I love our purple pea vines.
Friday, November 13, 2009
Say It Ain't So!
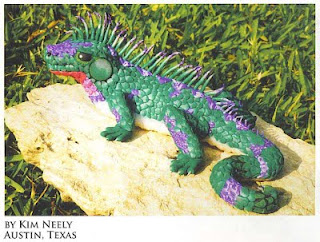
Wow! That thing is excellent! Such details - the toenails and scales and eyes and spikes ... Just wonderful I think. Maybe with years and years of practice and a brain transplant, maybe I could make something that good someday.
Then I read the caption.

WHAT?? "One of my first attempts at sculptures". Are you kidding me?!
I threw the mag down in disgust. MY attempts so far at sculpture have not been good. Other-Half says, don't be discouraged, you just need to find a class to take where they'll teach you the basics and start you off with something simple, like a snake. A snake? I tried a snake, I says. They'd need to start me off with something really simple, like a marshmellow.
With a grunt I pick the magazine back up and continue reading. It gets worse. Much worse. Did you read the last sentence? "I'm 13 years old ...".
Say it ain't so! Put to shame by a 13 year old's first attempt. Sigh.
Kim, if you're out there, GREAT job.
Friday, October 30, 2009
Christmas Cactus 2009
So I took some cuttings home and put them in a glass with water and left it on my front porch. There didn't seem to be much change at all from day to day. It wasn't dying, but it didn't seem to be growing either.
Then the second weekend of October, temps dropped and we had snow in the forecast so I moved it indoors. Placed it on the shelf over my kitchen sink, directly under the cabinet light. Within days, it was noticably bigger. The little bumps on the ends grew into pink buds, and then the buds started blooming. It's blooming like crazy now, a new bud opening almost every day.
(Click images for larger pictures.)
 |  |
 |  |
 |  |  |
Sparkle Plenty Necklace
Sparkle Plenty
Conversation starter show stopper stunning!
Festive one of a kind piece with real pearls and Swarovski crystals - and free shipping - how could you go wrong with this?
It happens to be a MoeArt creation and Moe happens to be my Aunt but I'm not being biased (well ,maybe a little), I just think it's a fabulous piece that deserves some attention. :) Check it out.
Friday, October 16, 2009
Brain Beads Bracelet
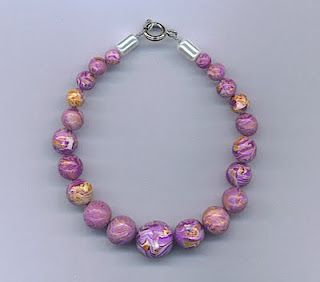
You can see I drilled some of the holes off-center, but look at the ends! My best attempt yet. Third time's a charm they say. :)
The beads don't look like brains (do they?) but the lump of scrap clay I made them from did, thus the name if you're wondering.

Earth Bead Bracelet II
I had enough Earth Beads left to do another bracelet but thought another plain strand would be boring. So I decided I'd make the original single-strand bracelet into a double-strand bracelet. And I decided having the two strands lying together would be no fun, I'd have to make a separator somehow.
No idea how I was going to do that, but I was bound and determined.
This is what I ended up with:

The ends on the new strand were an improvement over the ends on first strand and I was pleased as punch with the separators. Can't explain how I got there, but the separators are on double lengths of jewelry wire so they are stiff enough to keep the strands separated and strong enough I think that they won't break.
 |  |
First Necklace

This was my first attempt at stringing beads together into something I could actually wear. I used plain beads from my Martian Bead set, which are the first beads I made. They look like they all have flat spots, but they don't, that's just the light reflection in the picture. Which, by the way, is not actually a photo. It's a scan. Put the necklace on the scanner and wah-lah! - nice pic with very little effort. Thanks to Tammy of Shimmerwyck Jewelry for that great tip!
But where was I? Stringing. This is when I learned that 1) there are LOTS of choices for what to string on, and 2) that at some point, learning real wire wrapping techniques would be a good idea. ;)
I strung it on an ultra-fine jewelry wire and then there it sat, no clasps, until I fudged my way through finishing the Earth Bead Bracelet. With that experience under my belt (Hah!) I tackled these ends. Better but still far from proper.
Tuesday, October 13, 2009
My New "Craft Corner"
The tall, narrow blue drawer slides out to reveal three more long shelves with semi-sides on them to keep things from falling out when I open it. I originally wanted to keep that space open, for magazines, but Other-Half made a magazine rack on the left end of the piece, so no need. Now I have a magazine rack and a nifty extra pull-out storage place. :)
 |  |
The wall outlet had to be changed. It was only a two-hole outlet while most everything I want to plug in has three prongs. Sigh. Always a complication somewhere. So Other-Half replaced the outlet for me. Wonderful! Except, the outlet was already nearly blocked by the edge of the table. When we put the shelf in place with its back lip, the outlet became inaccessible. :(
Raising the outlet was out of the question so ever-thinking Other-Half cut the table legs down a few inches. :) Great! That made the outlet fully accessible, 'cept now the rolling cart I have my clay and beads stored in didn't fit under the table anymore. So I had to move the cart elsewhere which meant moving a chair that had occupied the space the cart is now in to the living room which meant re-arranging the living room some to make room for the chair. Whew!
But it all worked out and I am deliriously happy with my new "craft corner" and with my Other-Half who not only gave his time and talent to this project but also gave up half his kitchen so that I could have a nice work space. :)
Sunday, October 4, 2009
Green Chair
But now that my kitchen/craft-corner makeover is mostly complete, I HAD to cover the chair, it was an ugly frown in an otherwise happy room.
So I retrieved the fabric and set to it. The seat was easy. I just cut a piece roughly the right size and stapled it on to the underside then trimmed the excess. Did the same with the arms, but added some extra padding first.
The back though, that's another story. It's curved and both sides as well as the edge all the way around are visible. Now some time ago, back when I was still on speaking terms with my sewing machine, I covered an identical chair in purple. For that one I cut a front piece, back piece, and edge piece, and somehow managed to sew all three pieces together, ending with a cover that fits right over the back and can be slipped off for washing. Ok, but not something I wanted to try with my fuzzy green fabric sans sewing machine.
So what to do? Well, like with many things, I just winged it. I stretched the fabric around the front and edges and stapled it on the back side, same way I did the seat. Half-way there; now I just needed to cut a piece to cover the back and attach it in a manner that wouldn't leave awful-looking seems all the way around.
I cut the piece and got some invisible thread I had lying around and set about trying to sew it on. Have you ever seen invisible thread?
It looks like this:

Don't see it? Neither did I. Just trying to thread the needle was an ordeal; sewing with it made me want to pull my hair out. I gave up and switched to a green thread instead, normal thread. Much better. I got the back piece sewed on and much to my delight, turns out the fabric is just fuzzy enough that the seam virtually disappeared. Great! I didn't have to worry about nice neat stitches or a straight seam.
Here's the chair:

A very quick make-over - if you don't count the year+ I had the fabric. :)
Friday, September 25, 2009
Work In Progress
One of the things that has been taking up my time is this work in progress. When finished, it's going to be the bestest custom craft-storage thingy ever. After, gads, three weeks? I hope to finally have it finished tomorrow. But hopes and reality often don't mesh, so we'll see ...
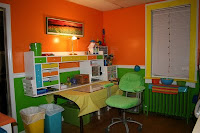
After my re-decorating of our kitchen this Spring, I claimed the table and surrounding area for a craft area. We never actually eat in the kitchen and having nowhere else to set-up, well, the kitchen it was. This is what my "craft corner" looked like then:

Yes, the table is an eyesore, but after years of abuse as a craft table, that's what happens. So until I decide what to do with it permanently, I'm just going to throw a table cloth over it. ;)
Anyway, my "craft corner" doesn't look like that anymore. It's messy now. Very messy. Thanks to my extremely generous Aunty Moe I have accumulated a grand amount of wonderful claying goodies. Wonderful stuff, delightfully colorful bottles and jars of assorted powders and paints that inspire me on sight. Except, they are all over my table, leaving little room to actually work and offending my sense of aesthetics. Something had to be done.
A few weeks ago, we're driving up the alley the night before garbage pick up. I will admit right here and now - I have no shame - I will pick up "curbside finds". One man's trash is another's treasure right? I like to call these finds "reclaimed goods". So we're driving along and spot this piece out for pickup. Either a hutch top or maybe a headboard thingy for a kids bed set, don't know, but it was in great shape, absolutely nothing wrong with it, and it had cubby-holes! Cubby holes! I want that! I can put it on top of the table to use for craft storage. My other-half agrees so we take it.
The piece was your typical heavy pressboard type piece with every surface veneered and laminated to look like white-washed oak. I can deal with it as-is and would have put it on the table right away but Other-Half decides it needs a major overhaul. He wants to make drawers for it so that all the cubby-holes are more practical. Sounds good to me.
So we take the piece to his brother's workshop where we have room to, well, work on it. Let the games begin. We decide along with making drawers, the whole thing needs to be painted. And painting means also having to sand it all first 'cause painting over slick veneer is not an option. So first, the whole thing has to be dismantled. Ever-thinking Other-Half decides a paint spray gun will be more better efficient than brushing. I agree. So off we go to our storage unit across the river to get our spray gun. Back at the shop, I have 18 zillion now-sanded pieces to cart outside for spray-gunning. Now, pneumatic paint spray guns kick out a lot of air so you have to have your pieces well above the ground so dirt and leaves and what not is not blown up into your wet paint. So that means gathering all sorts of what-nots from the shop and carting them outside to set up make-shift above-ground tables to put the dismantled pieces on. THAT done, we get to spraying. Then there's nothing to do but wait for paint to dry. And while the paint is drying, every gnat within five miles as well as a two bees and six flies, decide to land in my wet paint. Sigh. Now I need to buff out the bugs and dust everything down between coats. We have to take all the pieces and all the what-nots that make up our make-shift tables back into the shop each time we're finished for the day. And dis-assemble and clean out the spray gun each time. And then bring out and set up everything again the next time. So the first step of base-coating became a dreadfully time-eating process.
Some eons later, we have that done. Other-Half re-assembles the now solid-white pieces into their former state of wholeness. I decide this thing is NEVER getting taken apart again so decide it'll be a good idea to fill all the screw holes with wood goop so I can paint over them. Great. Except that means waiting for the goop to dry, then sanding it, then, sigh, painting all those areas again, then, sigh, waiting for THAT paint to dry.
Meanwhile, Other-Half is contructing the drawers and trays to fill the cubby-holes. This involves clamping and gluing, which, you guessed it, means more time waiting for glue to cure. The there's more wood goop to apply to fill imperfections left from assembling, waiting for that to dry, and finally, sanding it all down. Whew!
So we finally get to the point where I can begin top-coating everything and me being me, I have to do it in four different colors. Five if you count white. All the drawers & trays need base-coating in white first, then color. This means lots more time waiting for numerous coats of paint to dry. This make-over could have been done in two days if it weren't for all the WAITING time. Plhppp. Patience is not a virtue of mine.
So, here is the main piece, re-assembled and painted:

and here is the painting-in-progress of the drawers:

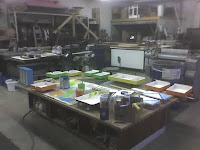
Tomorrow, I hope to have the painting finished and the drawer bottoms lined, and that'll be that, we can finally put this baby to bed and move on to other things. I can't wait.
Wednesday, September 16, 2009
Time Off For Bad Behavior #3

I just want to know, how do you mistakenly butcher a deer? Did he mistake it for a big log of pepperoni?
Wednesday, August 26, 2009
Earth Bead Bracelet

Now to actually make something out of them. Oh my. I have a ton of beads as well as beading "accessories" but had never actually made a piece of jewelry. Why? Because while I was quite confident I could string beads together I had no clue what to do with the ends once I got there. Or what I should chose to string them on in the first place. I ended up going with a fine gauge wire and after several false starts and several spills, I had a bracelet assembled out of my Earth beads and some glass beads I was gifted with.
But I still wasn't confident about how to finish off the ends. I was told I needed "crimp" beads. Ok. Off to Michaels I went. Uh-Oh. There are a lot of different types of "crimp" beads! I bought three different kinds and managed to "seal" off the ends of the bracelet so no more bead spills. But still had to conquer a fastener of some sort. I ended up using a basic spring ring and jump ring.
I don't remember at this point how I finally managed to attach each to an end, but it did involve bringing out the soldering iron, wherein I learned that the solder I have did not want to stick, no-how, no-way, to the jump ring or crimp beads. Which is why, in the picture, you don't see the actual clasp ends of the bracelet. They're functional but not pretty. ;)
Here's the finished bracelet.

I've worn if often now and I'm confident it won't fall off or break, but I need to devote some time and brain cells to learning how to properly attach clasps to finish a piece.
Monday, August 10, 2009
This is Not a Tute
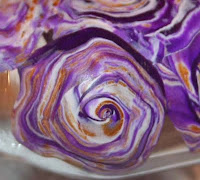
I started with this, a brain of pre-conditioned, pre-mixed clay I had been gifted with.

I pinched off pieces of it, smooshed them up a bit to further mix & mute the colors, then rolled the pieces into little snakes.

Then, holding the snake in one hand, I used the thumb and forefinger of the other to gently twist down its length. The closer and harder you twist, the tighter the spirals will be. And the easier they are to break! I broke a ton of them while twisting. I was aiming for a random pattern so wasn't worried about being consistent here.

With some "twisty snakes" made up, I went in two different directions with them.
1) I lined up a number of them to form a rectangle, then fed it through my pasta machine 'til I had a sheet in the thickness I wanted.

2) I coiled twisted snakes into lollipops, then used a brayer to flatten them, resulting in nicely defined spiral patterns.

Also, if you know the "back" side of your spirals aren't going to be visible in your project, you can stick your coils onto a flat piece of scrap clay and feed it through your pasta machine (or hand roll it), then when you've reached the desired thickness & pattern, cut out the areas you want to use. This way was more manageable, but I couldn't apply it to my bottle since the scrap backing side was gong to be visible.
So, that's how I made my bottle. And remember, this was not a tute. :)
Saturday, August 1, 2009
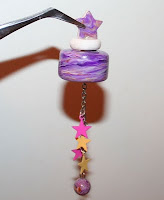
Starry Night Bottle
 |  |
I decided to dangle little metal star charms from a chain inside the bottle and to adorn the cap with a star. I didn't have any purple or gold star charms, but I did have pink and yellow and that was close enough for me. ;)
 |  |
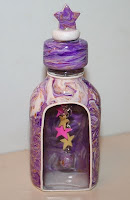
Here's the finished bottle:
 |  |
Thursday, July 30, 2009
Time Off For Bad Behavior #1
Here's a short story from Tuesday's paper: First Report
Did you read it?
"Radio scanner reports indicate he was wearing a ski mask with antlers".
WHAT?? Where would one buy a ski mask with antlers? Likely nowhere, so it must be home-made. But why on earth would anyone want to attach antlers to a ski mask in the first place? And why would they choose to wear that to a robbery? Nothing inconspicuous at all about walking around in a ski mask with antlers on it right?
I laughed all day after reading this. There I am on the job, pulling nails out of plywood - hundreds of them! - and I'd suddenly just start laughing. My other-half would look at me and ask "ski mask with antlers?". Yep! It was just deliriously funny to me.
Wednesday's paper carried this front-page follow up story: Second Report
Turns out it was not a ski mask with antlers, it was ... wait for it ... a Batman mask! The paper even included a picture of the discarded mask lying on the sidewalk. This is just getting better and better!
Never mind the question of why would one wear something so conspicuous to a robbery, the bigger question is, how did the witnesses confuse antlers with bat ears?
 Antlers or bat ears? Antlers or bat ears? Only in P'burg, folks.
Frosted Sandpaper
How on earth did that happen?!? One of life's little mysteries I guess.
Saturday, July 18, 2009
A Real Snake
Came across this act of nature on the job site yesterday. A little Garter Snake in the process of consuming a live toad. I know this is how snakes eat but had never seen it live in the wild. Will probably never see it again, either. A little gruesome? Sure. Did we feel a little bad for the toad? Sure. But it's nature and it's simply amazing how snakes can consume prey so much larger then their own mouths & bodies.
To save the squeamish from seeing something they may not want to see, I'm posting links to the pics here rather then the pics themselves.



![[Beatnik Bubbles] Bath Towel Set [Beatnik Bubbles] Bath Towel Set](https://rlv.zcache.com/beatnik_bubbles_retro_polka_dot_striped_rainbow_bath_towel_set-r6ff2efcc40994c988ffa9c029a606789_ezaga_550.jpg?rlvnet=1)
![[Geometric Tie-Dye] Acrylic Coaster Set [Geometric Tie-Dye] Acrylic Coaster Set](https://rlv.zcache.com/peace_sign_geometric_rainbow_tie_dye_acrylic_coaster_set-r0267d5072cb246fc8dae868f4ecada8c_0mkpe_550.jpg?rlvnet=1)
![[Atomic Tie-Dye] Stone Coaster [Atomic Tie-Dye] Stone Coaster](https://rlv.zcache.com/atomic_tie_dye_rainbow_colors_peace_sign_symbol_stone_coaster-rd9f36a3b29564c25a5d2c8d7807c6b6f_zxeh9_550.jpg?rlvnet=1)
![[Harlequin Tie-Dye] Accent Pillow [Harlequin Tie-Dye] Accent Pillow](https://rlv.zcache.com/harlequin_tie_dye_diamond_fractal_checkered_v2_throw_pillow-re2dab7a710ca40c19e8721db2ac89a5e_6s309_8byvr_550.jpg)
![[Painters Cloth] Espadrilles [Painters Cloth] Espadrilles](https://rlv.zcache.com/painters_cloth_distressed_rainbow_tie_dye_espadrilles-r9c66833b65fd4649b2de6ad464abf10e_012y1_550.jpg?rlvnet=1)