
With the importance Zazzle has placed on Cover Photos, we've all been struggling to make our own in a hurry. While Zazzle has conveniently provided us the options to download our artwork or download a product mockup view, the product mockups are not on a transparent background. A transparent background is necessary for inserting your product view into your own unique Cover image, but making it transparent is a challenge and even for those with the skill to do it, very time consuming.
Coffee mugs are a super popular item on Zazzle but because of the way the design area is, it's one of the products where the artwork download doesn't cut it - you really need the Product Mockup view. So I dusted off my Photoshop skills and made a template file that can be used to turn your downloaded Product Mockup into one with a transparent background, in just a few clicks and with no skills required. There's a link to download my .psd file at the end of this post. I made it in Photoshop CC 2019 and my instructions reflect that; if you're using another version your menu options may be different but you should still be able to find your way along.
I made this template for the Left and Right views of the 11oz Combo Mug but it also works with the Classic Mug.
So here we go. First thing is you need to download the Product Mockup of your mug from Zazzle. Go to the product page, chose the Left or Right view, and then click "More Options" from the top menu bar. Then click "Download Product Mockup".

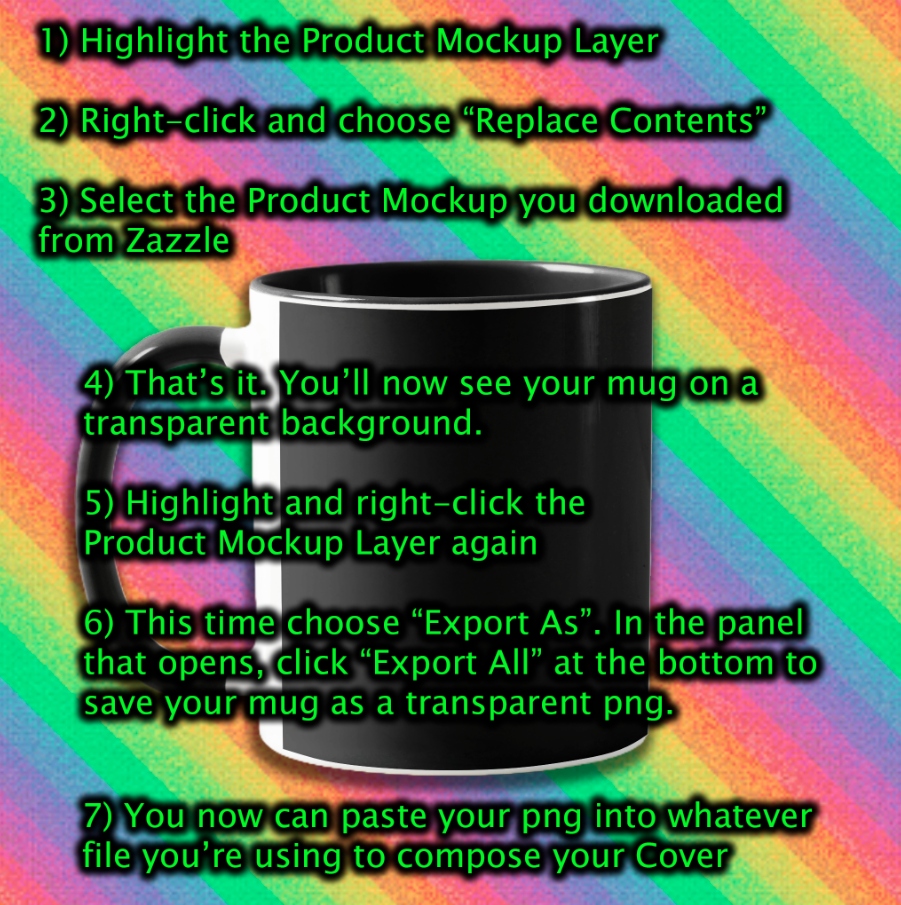


That's all there is to it! You'll now see your mug on a transparent background. To save your mug image on the transparent back, highlight the "Right Product Mockup" layer again, right-click, and this time choose "Export As".

Now, once you've Replaced Content to insert your own mug, you can continue editing and creating your final Cover in this file instead of exporting but I wouldn't recommend it as you could easily overwrite the working template for transparentizing. But if you do want to do this, here's what to know:
Use the Background layer group to insert your own content.
Use the Mug Mask layer to add drop shadowing to the mug.
Use the Product Mockup layer to edit mug colors.
Note that the Mug Mask and Product Mockup layers are linked so you can re-size and/or move the mug around the canvas, and still use the Replace Contents option after doing so as often as you want to insert different mug designs into the same mockup scene you've created. So if you want to do 50 Covers of mugs that are all the same except for the actual mug design, you can do that with this template, you just have to be sure not to overwrite your master-copy. And always when starting a new project, use the original 2028 x 2028 download from Zazzle with this template.
A few more notes: I have an example Drop Shadow layer effect applied to the Mug Mask layer. You should toggle this off or use Clear Layer Style to remove it altogether. Just be sure that it is not on when you do "Export As" or the drop shadow will be included in the exported image. I recommend that you always export a "clean" image, no shadowing applied, so that you can import/paste it into whatever other file you are editing it in and create your needed shadowing there after it's in place.
Here's the link to download the file from my website:
https://colscreations.com/SharedFiles/ZazzleTemplates/Templates-Mug-11oz.psd
This is totally free to download and use for creating your Zazzle Cover Images. Please do not re-distribute the file. If you want to share it with someone please instead direct them to this blog page where they can download it directly. No attribution is required but if you find this helpful, I do ask that in return you please promote something from my shop. Thank You!

![[Beatnik Bubbles] Bath Towel Set](https://rlv.zcache.com/beatnik_bubbles_retro_polka_dot_striped_rainbow_bath_towel_set-r6ff2efcc40994c988ffa9c029a606789_ezaga_550.jpg?rlvnet=1 "[Beatnik Bubbles] Bath Towel Set")
![[Geometric Tie-Dye] Acrylic Coaster Set](https://rlv.zcache.com/peace_sign_geometric_rainbow_tie_dye_acrylic_coaster_set-r0267d5072cb246fc8dae868f4ecada8c_0mkpe_550.jpg?rlvnet=1 "[Geometric Tie-Dye] Acrylic Coaster Set")
![[Atomic Tie-Dye] Stone Coaster](https://rlv.zcache.com/atomic_tie_dye_rainbow_colors_peace_sign_symbol_stone_coaster-rd9f36a3b29564c25a5d2c8d7807c6b6f_zxeh9_550.jpg?rlvnet=1 "[Atomic Tie-Dye] Stone Coaster")
![[Harlequin Tie-Dye] Accent Pillow](https://rlv.zcache.com/harlequin_tie_dye_diamond_fractal_checkered_v2_throw_pillow-re2dab7a710ca40c19e8721db2ac89a5e_6s309_8byvr_550.jpg "[Harlequin Tie-Dye] Accent Pillow")
![[Painters Cloth] Espadrilles](https://rlv.zcache.com/painters_cloth_distressed_rainbow_tie_dye_espadrilles-r9c66833b65fd4649b2de6ad464abf10e_012y1_550.jpg?rlvnet=1 "[Painters Cloth] Espadrilles")
2 comments:
Hi fellow zazzler, do you know the command on GIMP for Replace Contents? I can't find...thanks (SHeindesigns)
Hi Shein,
I don't use Gimp so don't know but I believe there are other designers in the forum who use it that could probably answer this.
Post a Comment