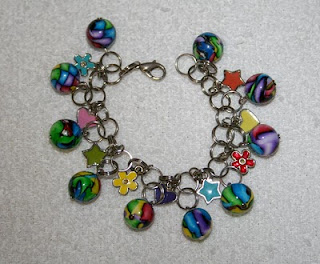
I wanted to make a bracelet out of them but wasn't sure what direction to go in with them as I am still in the beginning stages of learning wire wrangling.
When I saw a picture of a bracelet that had been made by simply linking split-rings together, I knew that was it. Not only should it be a no-brainer, I said to self, it should also make for secure links I don't have to worry about being pulled open.
So I decided to make a charm bracelet for my 11-yr old niece. After linking up enough split-rings to make the "base" of the bracelet and adding the six bead charms, I realized, OOPS!, not a no-brainer afterall. It wasn't hanging right. So I undid it all and started again, this time paying close attention to which "side" of the rings to attach the next ones to. That meant constantly picking it up and straightening it out to see which way the next ring should be. So I twisted up two sticks of wire and stuck them in a block of styrofoam, to hold the bracelet stretched out for me. Not pretty, but worked like a charm. (Pun intended. Hee.)

You may have noticed there are 10 beads there, not 6. Six was not enough, not even for a small wrist, so I had to find some of the same scraps to make up more. After much contemplation over how long a bracelet should be for an 11-yr old, I decided 10 beads would work out just right. So I made 4 more beads, strung it all up, and added the little metal charms.
My first charm bracelet.


(After taking the pictures, I switched out the last end ring for a larger, colored one, to make it easier to find the end to fasten it with.)


![[Beatnik Bubbles] Bath Towel Set [Beatnik Bubbles] Bath Towel Set](https://rlv.zcache.com/beatnik_bubbles_retro_polka_dot_striped_rainbow_bath_towel_set-r6ff2efcc40994c988ffa9c029a606789_ezaga_550.jpg?rlvnet=1)
![[Geometric Tie-Dye] Acrylic Coaster Set [Geometric Tie-Dye] Acrylic Coaster Set](https://rlv.zcache.com/peace_sign_geometric_rainbow_tie_dye_acrylic_coaster_set-r0267d5072cb246fc8dae868f4ecada8c_0mkpe_550.jpg?rlvnet=1)
![[Atomic Tie-Dye] Stone Coaster [Atomic Tie-Dye] Stone Coaster](https://rlv.zcache.com/atomic_tie_dye_rainbow_colors_peace_sign_symbol_stone_coaster-rd9f36a3b29564c25a5d2c8d7807c6b6f_zxeh9_550.jpg?rlvnet=1)
![[Harlequin Tie-Dye] Accent Pillow [Harlequin Tie-Dye] Accent Pillow](https://rlv.zcache.com/harlequin_tie_dye_diamond_fractal_checkered_v2_throw_pillow-re2dab7a710ca40c19e8721db2ac89a5e_6s309_8byvr_550.jpg)
![[Painters Cloth] Espadrilles [Painters Cloth] Espadrilles](https://rlv.zcache.com/painters_cloth_distressed_rainbow_tie_dye_espadrilles-r9c66833b65fd4649b2de6ad464abf10e_012y1_550.jpg?rlvnet=1)
9 comments:
Col, That bracelet is mighty pretty and I predict that niece of yours is going to love it. The stained-glass beads are such lovely colour combos and OH SO SHINY!!!
Thanks! I love watching dull clay turn shiny.
Great idea to have a different coloured end ring to spot it to fasten.
Those beads are great - wish I had scraps that looked like that!
What's the secret of the shine?
Cara
Thanks, Cara!
I hand sanded them with 400 & 800 grit. I am not one to go nuts with many different grits, usually just use some combination of 400, 600, & 800. That seems to be enough to buff a nice shine out of them. (I use a Dremel with a felt buffing pad for that.)
It is GORGEOUS, Col! Wowzers! Very nice work and your niece is going to love it forever.
Col, Until Bubblyart pointed it out at PCC, I missed seeing your hint on how to attach the charms correctly. I have a similar challenge every time I try to do a necklace with chain and charms. It's such a pain that I dread the stringing process, but like the eventual look. Your "tether"idea is BRILLIANT. This morning I adapted it to making a necklace by suspending it between the top of a bookcase and a tall goose neck lamp. I will think of you
whenever I place suspended charms on chain! Thanks for the "CHARMING" idea.
Thanks, Melody. I am glad I posted something that was helpful to someone. :)
Re-reading this four years later I need to add that now I do indeed go a little nuts with sanding. I usually start with 400 grit and work my way up to 1200. I have learned that the more time you spend on the sanding process, the easier it is to buff out a high shine.
Hard work and solid preparation is it's own reward. The effort shows up in the finished product.
Post a Comment