2 months ago
Saturday, April 17, 2010
Textured Heart Necklace
What was I thinking? It seemed like a good idea to wrap wire around silk cord and add little glass beads for decoration. But it took six arms and I of course only have two. Don't think the "look" was worth the effort.
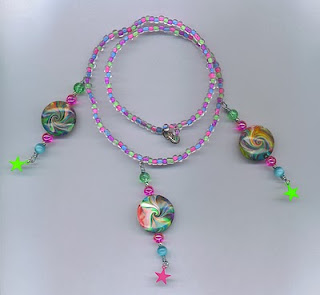
Carnival Necklace
Polymer clay swirled-lentils, glass seed beads, and 3 metal star charms.
My first real effort at wrapped loops.
(The lentils aren't really squished on top, they just look that way because of the light reflection.)
Sort of a silly necklace, but fun. Looked great I thought with my black turtle-neck sweater. I sent this to my 11-yr old niece.
See it in my Photo Gallery
My first real effort at wrapped loops.
(The lentils aren't really squished on top, they just look that way because of the light reflection.)
Sort of a silly necklace, but fun. Looked great I thought with my black turtle-neck sweater. I sent this to my 11-yr old niece.
See it in my Photo Gallery
First Charm Bracelet
I had these six "stained-glass" beads I had made from cane scraps. (Not my canes as I haven't made enough yet to have any interesting scraps.)
I wanted to make a bracelet out of them but wasn't sure what direction to go in with them as I am still in the beginning stages of learning wire wrangling.
When I saw a picture of a bracelet that had been made by simply linking split-rings together, I knew that was it. Not only should it be a no-brainer, I said to self, it should also make for secure links I don't have to worry about being pulled open.
So I decided to make a charm bracelet for my 11-yr old niece. After linking up enough split-rings to make the "base" of the bracelet and adding the six bead charms, I realized, OOPS!, not a no-brainer afterall. It wasn't hanging right. So I undid it all and started again, this time paying close attention to which "side" of the rings to attach the next ones to. That meant constantly picking it up and straightening it out to see which way the next ring should be. So I twisted up two sticks of wire and stuck them in a block of styrofoam, to hold the bracelet stretched out for me. Not pretty, but worked like a charm. (Pun intended. Hee.)
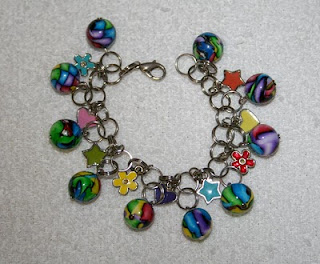
You may have noticed there are 10 beads there, not 6. Six was not enough, not even for a small wrist, so I had to find some of the same scraps to make up more. After much contemplation over how long a bracelet should be for an 11-yr old, I decided 10 beads would work out just right. So I made 4 more beads, strung it all up, and added the little metal charms.
My first charm bracelet.
(After taking the pictures, I switched out the last end ring for a larger, colored one, to make it easier to find the end to fasten it with.)
I wanted to make a bracelet out of them but wasn't sure what direction to go in with them as I am still in the beginning stages of learning wire wrangling.
When I saw a picture of a bracelet that had been made by simply linking split-rings together, I knew that was it. Not only should it be a no-brainer, I said to self, it should also make for secure links I don't have to worry about being pulled open.
So I decided to make a charm bracelet for my 11-yr old niece. After linking up enough split-rings to make the "base" of the bracelet and adding the six bead charms, I realized, OOPS!, not a no-brainer afterall. It wasn't hanging right. So I undid it all and started again, this time paying close attention to which "side" of the rings to attach the next ones to. That meant constantly picking it up and straightening it out to see which way the next ring should be. So I twisted up two sticks of wire and stuck them in a block of styrofoam, to hold the bracelet stretched out for me. Not pretty, but worked like a charm. (Pun intended. Hee.)
You may have noticed there are 10 beads there, not 6. Six was not enough, not even for a small wrist, so I had to find some of the same scraps to make up more. After much contemplation over how long a bracelet should be for an 11-yr old, I decided 10 beads would work out just right. So I made 4 more beads, strung it all up, and added the little metal charms.
My first charm bracelet.
(After taking the pictures, I switched out the last end ring for a larger, colored one, to make it easier to find the end to fasten it with.)
Subscribe to:
Posts (Atom)