Wednesday, August 26, 2009

Earth Bead Bracelet

After all the orange & green from my Martian Beads and first two covered bottles, I couldn't wait to break out some new colors. Blue & white was on my mind so I took the dark blue clay I had and gradually mixed in white 'til I got a soft baby-blue blue. Good. Now I had the two colors I wanted but no idea what I wanted to try making with them. I started "braiding" thin extruded ropes of both colors together and that ended up keeping me occupied for some time. I kept breaking them or smushing them or making uneven twists. I had no plan for what to do with the braids, I was just bound and determined by that point to make some that looked halfway decent. I finally ended up with a few short halfway decent strands and a bunch of scraps. So I did the easy thing and rolled the scraps up into a bunch of beads. Little Earths I think. Now I have Earth beads to go with my Martian beads. :)

Earth Beads

Now to actually make something out of them. Oh my. I have a ton of beads as well as beading "accessories" but had never actually made a piece of jewelry. Why? Because while I was quite confident I could string beads together I had no clue what to do with the ends once I got there. Or what I should chose to string them on in the first place. I ended up going with a fine gauge wire and after several false starts and several spills, I had a bracelet assembled out of my Earth beads and some glass beads I was gifted with.

But I still wasn't confident about how to finish off the ends. I was told I needed "crimp" beads. Ok. Off to Michaels I went. Uh-Oh. There are a lot of different types of "crimp" beads! I bought three different kinds and managed to "seal" off the ends of the bracelet so no more bead spills. But still had to conquer a fastener of some sort. I ended up using a basic spring ring and jump ring.
I don't remember at this point how I finally managed to attach each to an end, but it did involve bringing out the soldering iron, wherein I learned that the solder I have did not want to stick, no-how, no-way, to the jump ring or crimp beads. Which is why, in the picture, you don't see the actual clasp ends of the bracelet. They're functional but not pretty. ;)

Here's the finished bracelet.
Bracelet
I've worn if often now and I'm confident it won't fall off or break, but I need to devote some time and brain cells to learning how to properly attach clasps to finish a piece.

Time Off For Bad Behavior #2

Beer HeistSeriously. This was actually in our paper.

Monday, August 10, 2009

This is Not a Tute

I'm a complete novice with polymer clay, I couldn't begin to teach anyone anything. But while puttering with some clay the other day, having no idea where I was going with it, I puttered myself right into a rather simple way to make swirly/spiraly patterns. This is how I arrived at the pieces I used to cover my Starry Night bottle so I figured what the heck, I'll share how I got there.

I started with this, a brain of pre-conditioned, pre-mixed clay I had been gifted with.
clay brain
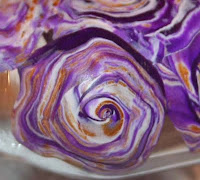
I pinched off pieces of it, smooshed them up a bit to further mix & mute the colors, then rolled the pieces into little snakes.
snakes
Then, holding the snake in one hand, I used the thumb and forefinger of the other to gently twist down its length. The closer and harder you twist, the tighter the spirals will be. And the easier they are to break! I broke a ton of them while twisting. I was aiming for a random pattern so wasn't worried about being consistent here.
twisted snakes

With some "twisty snakes" made up, I went in two different directions with them.

1) I lined up a number of them to form a rectangle, then fed it through my pasta machine 'til I had a sheet in the thickness I wanted.
sheet

2) I coiled twisted snakes into lollipops, then used a brayer to flatten them, resulting in nicely defined spiral patterns.
lollipop spiral
Also, if you know the "back" side of your spirals aren't going to be visible in your project, you can stick your coils onto a flat piece of scrap clay and feed it through your pasta machine (or hand roll it), then when you've reached the desired thickness & pattern, cut out the areas you want to use. This way was more manageable, but I couldn't apply it to my bottle since the scrap backing side was gong to be visible.

So, that's how I made my bottle. And remember, this was not a tute. :)

Saturday, August 1, 2009

Starry Night Bottle

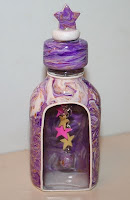
I covered one side of a little glass bottle with spiraly-patterned pieces of clay, fully intending to cover it all. But I thought it was kind of cool looking through the glass on the un-covered side so I decided to leave it open. A window into the bottle if you will.
SpiralsThrough the Glass
It also reminded me of Van Gogh's "Starry Night". I know, Starry Night is blue not purple, but nevertheless, that's what it made me think of. So with that er, "theme" in mind, it needed stars. And it needed something inside the window.

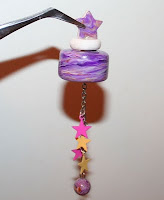
I decided to dangle little metal star charms from a chain inside the bottle and to adorn the cap with a star. I didn't have any purple or gold star charms, but I did have pink and yellow and that was close enough for me. ;)

CapCap
To assemble the cap, I drilled a hole through the center of the cap (well, I was aiming for the center anyway) and through the white star base. I drilled half-way through the star. I snipped an eyed skewer to length, basted it with super glue, and inserted it through the cap and base and into the star. That gave support to the star topper, and gave me a loop on the inside of the cap to attach the chain to.
Here's the finished bottle:

FrontBack
A completely useless knick-knack, but I'm pretty pleased with it. :)