A while ago, a friend gave me this great hoodie. Neon lime green with a subtle tie-dye pattern on it. Most excellent! Delighful as it was, I decided I had to "enhance" it a bit. Partly because she has an identical one, and partly because I have a reputation for personalizing my jackets and shoes, so ya know, wouldn't want to let people down ;) When I start looking like Mimi, someone stop me!
First thing I had to do was slice the neckline open. More convenient when pulling it on or off, and I just like the way it looks. But for reasons best left unsaid, I ended up with not just a slice, but with a u-shaped section of fabric actually cut out. I just happened to have a heart shaped patch in a matching color so I sewed that onto the wider-than-wanted opening.
Now, I have zero skills when it comes to needle & thread crafts. None. So I got this nifty "invisible thread" to use, to hide my messy amateur stitching. For anyone who doesn't know, this is what invisible thread looks like:

See? It doesn't look like anything because you can't see it! Sewing with this stuff is a total nightmare, but I got the heart on without too much hair loss.
That should have been good enough but I found some ribbon in my ribbon-drawer that I thought would be just dandy on the hoody. Why does someone who can't sew have a drawer full of ribbon? I don't know for sure but I think it just jumps into my basket at the craft store all by itself.
So I decide to sew a length of ribbon around each cuff. Easy right??
I begin by carefully measuring out a length of ribbon and sewing one end of it all the way across the width of the cuff, securing it in place so I can sew the edges all the way around the circumference of the cuff. After several hours and much hair-pulling and cursing, I finally get one edge of one cuff done. Pleased as punch with myself, I put an arm though the sleeve for a test-look. Oh %#&$#@! I can't fit my hand through the cuff now!
Turns out that cuffs stretch to let your hands through but ribbon doesn't. Did my amateur self think to allow for the stretchiness factor? So I get a seam-ripper gizmo out and set about undoing my progress. And let me tell ya', even with a magnifying lamp, ripping out invisible thread is just as hard as stitching it on!
Back to where I started, ripped back off except for the starting end seam, I need a break so fire up the Instant Messenger and tell my Mom and Sister my tale of woe. My sister, in her practical, logical. problem-solving way, says "Can't you just buy a ribbon that is stretchy?". Thanks for the assisterance (get it?) but I want to use THIS ribbon. WAHHHH!
Frustration now vented, inspiration strikes! I will put a can inside the cuff to hold it stretched open enough to get my hand through, then sew. How smart am I right? I end up with a can of dog food that is just about the right diameter and begin sewing again. With the can in there, it's extremely difficult to poke the needle through the fabric, especially since my fingers don't know what they are doing anyway, but several hours later, I've made it about half way around one side of one cuff again. It is at this point that I realize, $%#@&, now that the cuff is stretched out a bit, the ribbon is now too short!! Back to the seam-ripper. Sigh.
I put the project on hold until I can waylay Snake-Lady and ask her advice. Snake-Lady is the nice upstairs neighbor who I know used to sew her own clothes. She tells me, well, for starters, I'd do it on a machine ... OK, I am not on good terms with my sewing machine, and even if I were, I can't fathom how I'd do it without sewing the sleeves shut as the cuffs couldn't possibly stretch around the base of the machine. So hows about telling me how'd you do it if you were going to do it by hand? Her advice is to stretch it around the can, pin it, take the can out, then use my fingers to stretch it from pin-to-pin while I sew.
Sounds reasonable so after a day or two's vacation from this ordeal, I start again. Now, I am predominantly a "lefty", but like most lefties, I am also rather ambidextrous. Which means if something doesn't come to me naturally I will use either hand until one learns what it is doing, or I will use whichever hand is most convenient to the task. Like painting in a tight corner or whatnot- easier to switch hands then contort to fit the space. So with the cuff pinned and can removed, I am struggling to hit on something that feels natural. Stretch with right, needle in left? Nope. Stretch with left, needle in right? Nope. Nothing feels natural and it seems as though one needs super-hero strong fingers to stretch the fabric as you manipulate the needle with the fingers of the other hand. AHHH! I need three hands! And the invisible thread constantly getting caught on the pins now in place is not helping matters!
But I persevere. And my Other-Half, watching me go bananas, asks "Why do you keep using that invisible thread if it's making you so crazy?". I reply, "Because my stitching is way out of whack so I don't want anyone to be able to see it". He says "Well, maybe if you used a thread you could actually see to work with, it wouldn't BE out of whack". Uh, Good point, Kemosabe, I'll keep that in mind if I ever attempt another sewing project.
Elated to FINALLY be done with what was supposed to be a quick & simple little project, I fill my Mom in on the outcome. "Pins?" she says, "I could have told you to pin it but it never occurred to me that you WEREN'T using them".
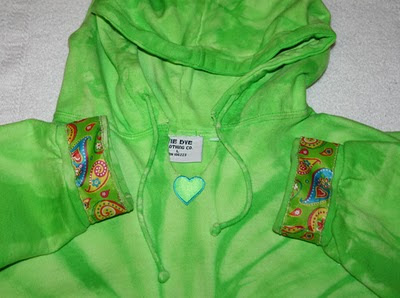
Was it worth the time and tribulations? Heck no! But I will wear this thing to my grave now!